Oh Lashes, Babe! The Scoop on False Lashes
Hey there, gorgeous! Have you ever been curious about false lashes? Oh boy, let me tell you, they are amazing! False lashes are a type of cosmetic enhancement that can instantly make your eyes pop and stand out. They are basically fake eyelashes that you can apply on top of your natural ones.
Let me tell you, false lashes can work wonders for your overall look. They can add volume, length, and curl to your lashes and really take your makeup game to the next level. Plus, they come in all sorts of shapes, sizes, and styles, so you can rock anything from a super natural to a dramatic and bold look.
If you’re new to false lashes, don’t worry, I got you covered. Here’s everything you need to know to master those fluttering falsies.
Supplies Needed: Let’s Get Lashed Up!
Y’all, if you’re ready to add some serious va-va-voom to your lashes, here’s what you need:
– Lashes: Duh. Go for some dramatic, fluttery lash style that fits your eye shape.
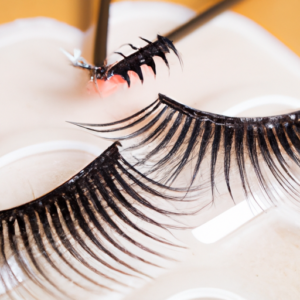
– Lash glue: This is the magic potion that makes the lashes stick. Opt for a waterproof one if you think you’ll get a bit weepy or plan on wearing them all day.
– Lash scissors: Unless you’re blessed with the perfect lash-lengths, you’ll want to trim them down a bit. Make sure you have some precision scissors that are specifically designed for this task.
– Lash applicator: Look, we’re not all blessed with surgeon-level hand-eye coordination. Lash applicators can help you ease the lashes into place without getting glue all over your face – or worse, your actual lashes.
Now that we’re all kitted out, let’s get those falsies slaying.
Getting Ready: Preparing The Lashes
Hey there, it’s time to get our lashes on point! Before we can apply them, we have to make sure they are prepared correctly. Here are the steps:
Step 1: Measure The Length Of The Lashes
The first thing I always do when preparing my false lashes is to make sure they fit my eyelid and lash line perfectly. I place the lashes on my eyelid and compare the length of the lash band to my natural lash line. If the lashes are too long, I trim them to fit my eye shape. Remember, the lashes shouldn’t extend past the outer corner of your eye.
Step 2: Trim The Lashes To Fit Your Eye Shape
Once I have measured the length and found the best fit, I use lash scissors to trim the excess material on the outer end of the lash band. This will make sure they fit your eye shape perfectly. It’s important to cut only a few lashes at a time, so you don’t accidentally cut off too much.
Step 3: Apply A Thin Layer Of Lash Glue To The Band Of The Lashes
When I am ready to apply my false lashes, I make sure to apply a thin layer of lash glue to the lash band. I use my lash applicator to pick up a small amount of glue, then start on one end of the lash band and gently work my way to the other end. Make sure you cover the entire lash band end to end with glue, but don’t apply too much or it will get messy.
Now that our lashes are properly prepared, we can move on to the next steps of applying them and achieving our desired look. Remember, a little patience and practice go a long way in perfecting lash application!
Get Ready to Flaunt Your False Lashes: Applying Them Like a Pro!
All set to take your lash game to the next level? Here’s how you apply false lashes like a pro!
First things first – position the lashes close to your natural lash line, starting from the outer corner of your eye and working your way towards the inner corner.
Apply gentle pressure on the base of the lash band and hold it in place for a few seconds to allow the glue to set. Don’t worry, it won’t take long!
Here’s a little tip – to ensure they are firmly in place, you can use an eyelash curler on both your natural and false lashes.
Voila! You are all set to flaunt those luscious lashes in style.
Remember not to go overboard with applying mascara on your false lashes- it can quickly turn clumpy. Instead, use mascara only on your natural lashes before applying the false lashes.
If you find that the false lashes are still not sitting right, it may be due to their length. You can use a pair of scissors to carefully trim them to fit your eye shape. Pro-tip: cut from the outer corner to maintain the natural curve of the lashes.
So, what are you waiting for? Give it a shot and rock that bold lash look!
Removing The Lashes: How to Remove Your False Lashes Easily and Safely
Okay, so you’ve had your fun with your false lashes, but now it’s time to take them off. Don’t worry, removing them is easy and safe! Just follow these simple steps:
First, grab a cotton swab and dip it in warm water or makeup remover. Gently rub the swab along your lash line to loosen the glue. Be patient and don’t tug or pull too hard, as this can damage your natural lashes.
Next, take hold of the outer corner of the false lash band and gently peel it away from your eyelid, working your way inward. Peel slowly and gently, keeping close to your natural lash line. If you encounter any resistance, use your cotton swab to apply a bit more warm water or makeup remover.
Voila! Your false lashes are off! Be sure to dispose of them properly or, if you plan on reusing them, follow the proper cleaning and storing techniques on this guide.
See, that wasn’t too hard! With a little patience and care, removing your false lashes can be a breeze. Happy lash-wearing!
6. Reusing The Lashes
Okay, let’s be real. False lashes can be a bit pricey, so why not get the most bang for your buck by reusing them? Here’s how:
Step 1: Clean Those Lashes
After carefully removing the lashes, it’s time to clean them. I find that using a cotton swab dipped in warm water and mild soap works wonders. Just gently swipe along the lash band, making sure to get rid of any leftover glue or mascara.
Step 2: Let Them Dry
Once the lashes are clean, it’s time to let them air dry for a few hours. This may seem like a hassle, but trust me, it’ll save you from ruining your lashes with leftover moisture.
Step 3: Apply a Thin Layer of Glue
Before reapplying the lashes, make sure to apply a thin layer of lash glue to the band. This will help the lashes stick better and last longer.
And voila! Your lashes are ready to be reused. It’s important to note that with each reuse, the lashes may lose some of their shape and fullness, but it’s still worth it (and more eco-friendly) to get a few extra wears out of them.
So, Are You Ready to Say Yes to the Lashes? Here’s My Final Verdict!
Okay, I won’t beat around the bush, I’m totally in love with false lashes! As someone who loves to experiment with their look from time to time, I can confidently say that false lashes are a game-changer. They give my eyes the perfect amount of drama and make me feel confident and sexy.
Not only are they an inexpensive alternative to lash extensions, but they’re also versatile and can add dimension to different eye shapes. Whether you’re going for a natural look or something more dramatic, it’s easy to find the perfect lashes to suit your preference and style.
Now, I know some people may have concerns about the application and maintenance of false lashes, but trust me, it’s not as difficult as it may seem! With the right supplies and a bit of patience, you can apply and remove your lashes in no time.
One of my favorite aspects of false lashes is that they can be reused multiple times. That means you can enjoy your new look and still get your money’s worth! Plus, by taking proper care of your lashes, you can ensure that they last as long as possible.
Overall, I would definitely recommend giving false lashes a try. Whether you’re an experienced makeup lover or just starting to explore the world of beauty, they are sure to add an extra dose of glamour to your look. So, what are you waiting for? Say goodbye to bare lashes and hello to the perfect faux flutter!