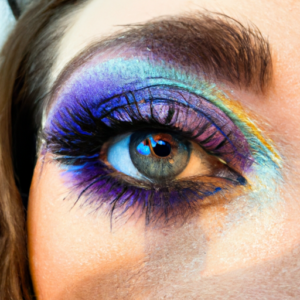
Mastering the Cut Crease Look: An Epic Guide
Are you tired of the same old eyeshadow routine? Do you crave a striking, bold makeup look that will turn heads and make you stand out from the crowd? Look no further than the cut crease look! This technique involves drawing a bold, defined line in your crease, emphasizing your eye shape and adding depth and dimension to your lids. But wait, there’s more! Once you’ve mastered the cut crease look, you’ll be able to experiment with different colors, textures, and finishes, creating endless variations on this iconic trend.
So why bother with the cut crease look? For starters, it’s a makeup game-changer. A perfectly executed cut crease can transform your eyes from ordinary to extraordinary, making them appear bigger, brighter, and more alluring. It’s also a versatile look that can be adapted to suit any occasion, from a casual daytime look to a dramatic nighttime statement. Plus, mastering this technique will help you up your overall makeup game, teaching you blending, highlighting, and precision skills that will serve you well in all your future makeup endeavors.
Step-by-Step Tutorial: Let’s Get Your Cut Crease On!
Gather around, makeup lovers! Today, I’m going to teach you how to achieve a stunning cut crease look. This eye makeup style is perfect for adding a touch of drama and glamour to your everyday makeup routine. And the best part? It’s not as challenging as it seems. So let’s get started!
Step 1: Primer and Conceal
First things first, prep your face by applying your primer and concealer as you usually would. This step helps your makeup stay put for longer while also hiding any skin discoloration or blemishes.
Step 2: Apply Eyeshadow Primer
If your eyelids tend to get oily or crease easily, an eyeshadow primer is an essential step in achieving a flawless cut crease. Apply it all over your lid and blend it out with your finger or a brush.
This is where the magic happens! Using a small brush, draw a line from the inner corner of your eye to the outer corner, following the natural curve of your eye socket. Don’t be afraid to take your time and make it as precise as possible.
Step 4: Apply Eyeshadow and Blending
Now comes the fun part! Choose a color that complements your skin tone and blend it along your lid, slightly overlapping the line you just drew. Then take a darker shade and apply it to the outer corner of your eye, blending it towards the center. Make sure to blend, blend, blend, so there are no harsh lines.
Step 5: Highlight the Brow Bone
Finally, apply a shimmery or matte highlight shade to the brow bone to make your eyes pop. Sweep it along your brow bone and blend it downwards into the darker shade to create a seamless transition.
Tips and Tricks to Perfecting Your Cut Crease Look
Creating a stunning cut crease is all about preparation and technique. Here are some tips and tricks to help you achieve the best results:
Use the Right Tools
Using the right tools can make a huge difference in the outcome of your cut crease. Invest in a good set of brushes that are specifically designed for eyeshadow application. You can also use tape to create a sharp line and prevent any fallout.
Choose Complementary Colours
When choosing your eyeshadow shades, consider your skin tone and eye color. Colors that complement your features will make your eyes pop and create a polished look.
Set Your Makeup with a Setting Spray
Setting spray is the finishing touch to any makeup look, and it’s especially important for a cut crease. It will help your makeup stay in place all day and prevent any creasing or smudging.
Now that you’ve learned the basics, it’s time to create your own cut crease look! Don’t forget to check out our guide on creating a dramatic makeup look for more beauty inspiration.
Tips and Tricks to Take Your Cut Crease Look to the Next Level
Hey there, lovely readers! Ready to take your makeup skills up a notch? In this section, I’ll share some insider tips and tricks to help perfect your cut crease look.
Use the Right Tools
The right tools will make all the difference. For your cut crease look, I recommend an angled brush and a small blending brush. An angled brush is perfect for precise lines, while a small blending brush will help you get the perfect gradient look.
Choose Complementary Colors
Choosing complementary colors will make your eye look pop! For example, if you’re using a cool-tone shade on your lids, opt for a warm-tone shade to blend into your crease. This creates a beautiful contrast and makes your eyes stand out.
Set Your Makeup with a Setting Spray
Once you’ve finished your cut crease look, set it with a setting spray. This will help your makeup stay in place and prevent it from creasing or smudging throughout the day.
There you have it, my top tips for perfecting your cut crease look! Remember, practice makes perfect. Keep trying and experimenting, and you’ll master this fabulous look in no time.
Conclusion: I’m loving my cut crease look!
Well, there you have it, folks! I hope you found this tutorial helpful and have a better understanding of how to achieve a stunning cut crease look. Don’t be intimidated by the precision and attention to detail this look requires. With practice and patience, you too can master the cut crease look and wow your friends and family.
Remember, the key to achieving this look is using the right tools, choosing complementary colors, and setting your makeup with a setting spray. Additionally, don’t be afraid to play around with different shades and textures to create a unique cut crease that’s perfect for your style and personality.
One thing to keep in mind is that achieving a perfect cut crease may take time and practice. Don’t expect to get it right on the first try, but don’t be discouraged by any mistakes either! Remember, practice makes perfect.
Lastly, don’t forget to have fun and experiment with this look! Whether it’s for a special occasion or your everyday makeup routine, the cut crease look is a versatile and bold statement that is sure to turn heads. So go ahead, grab your brushes, and let’s get cutting!