Ahoy, Mascara Lovers! Let’s Learn How to Amp Up Thin Eyelashes
Hey, guys! I’m thrilled to talk about one of my favorite makeup products today – mascara! As someone who used to struggle with thin eyelashes, I understand how tricky it can be to find the right mascara to get that perfect voluminous look. In this post, I’ll share my expert tips and tricks on how to make your lashes look fuller and how to apply mascara for the best results. So, let’s get started!
Types of Mascara for Thin Eyelashes: The Good, The Bad, and The Game-Changing
Okay, let’s talk about mascara. As someone with thin, sparse lashes, I’ve tried just about every formula and brand out there. Here’s what I’ve learned:
The Good
When it comes to mascara for thin eyelashes, look for a lightweight and buildable formula. You want a product that will add volume and length without weighing down your lashes. My personal favorites are tubing mascaras. These are formulas that wrap around your lashes, creating a tube-like effect. Not only do they add volume and length, but they’re also waterproof and smudge-proof.
The Bad
Avoid using mascaras that contain heavy waxes or oils. These can weigh down your lashes and make them look clumpy. Additionally, stay away from volumizing mascaras that are designed for thick lashes. These formulas will only make your thin lashes look worse.
The Game-Changing
If you really want to take your mascara game to the next level, try using a lash primer. These products are designed to condition your lashes and create a smooth base for the mascara to adhere to. Some primers even contain fibers that will add length and volume to your lashes. Trust me, once you start using a lash primer, you’ll wonder how you ever lived without it.
Remember, when it comes to mascara for thin eyelashes, less is more. Use a good quality product, prepare your lashes properly, and apply the mascara carefully. With a little practice, you’ll have the beautiful and voluminous lashes you’ve always dreamed of.
Get your lashes ready for the magic of mascara
Before you start applying mascara, it’s important to prepare your lashes. This will help you get the best results and avoid clumping or smudging.
First, grab an eyelash curler – it’s my secret weapon for giving my lashes lift and volume. Make sure it’s clean and begin by opening the curler and positioning it at the base of your lashes. Close the curler gently and hold it in place for a few seconds. Press it lightly against the lashes to create a curve. Release the curler and move it up towards the tips of the lashes, repeating the process. I recommend not curling too close to your lash line to avoid pinching your skin, which can be painful and cause tearing.
Next, use an eyelash primer. Not only will it prepare your lashes for mascara, but it also protects them from damage, moisturizes and smooths them out. I love to use a primer that has natural ingredients that nourish my lashes in a lightweight formula. Apply the primer from the base of your lashes to the tips, covering each lash evenly. Feel free to use your fingers to evenly distribute the primer throughout the lashes, so you start with a clean and smooth base.
Now you’re ready to apply your mascara. Make sure your lashes are completely dry before adding mascara so that it can adhere properly. A dry base will help you achieve a fuller look, removing extra oils from your eyelashes. Applying just one coat will do nothing but intensify the colours of your eyelashes, making them look darker. Don’t forget that quality mascaras will take time to dry and don’t forget to breathe while applying, otherwise, it can lead to shaky hands and uneven mascara application.
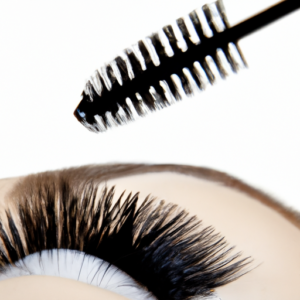
Applying the Mascara
Okay, now it’s time for the fun part – applying the mascara! I always start at the base of my lashes and wiggle the wand side to side as I move it up towards the tips. This helps to evenly distribute the mascara and make my lashes look fuller. Don’t forget to get the outer corners and inner corners of your lashes as well.
If you want even more volume, you can apply a second coat of mascara once the first coat is dry. Just be careful not to overdo it and make your lashes look clumpy. If you do notice any clumps or stuck-together lashes, gently separate them with a lash comb or clean spoolie brush.
One of my favorite tricks for really making my lashes pop is to lightly brush the tips of my lashes with the mascara wand after each coat. This helps to elongate and define the lashes and give a more dramatic effect.
Remember, you don’t need to apply lots of pressure when putting on mascara. A gentle touch is all that’s needed to achieve great results without damaging your lashes.
Finishing Touches: The Cherry on Top
Alright, we’ve made it to the final step in our mascara routine, the finishing touches. This is where we add the cherry on top to our perfectly applied mascara. First things first, let’s grab our trusty spoolie brush. A spoolie brush is a small, disposable brush that looks like a mascara wand without any product.
Use the spoolie brush to comb through your lashes. This will help to remove any excess mascara and give your lashes a more natural look. Make sure to wiggle the brush back and forth as you comb through your lashes. This will help to separate your lashes and prevent them from clumping together.
Next, let’s take a step back and assess any areas that might need a little bit of extra love. If you notice any clumps or unevenness, take a small brush or a q-tip and gently go over the area to smooth everything out. Don’t be afraid to take your time with this step and make sure everything looks perfect.
Finally, this may seem a little unconventional, but adding a little bit of translucent powder to your lashes can actually help to set your mascara and prevent smudging. Take a small brush and dust a tiny bit of powder over your lashes. Be careful not to get any powder in your eyes and use a light hand.
There you have it, the cherry on top of your perfectly applied mascara. You now have beautiful, voluminous lashes that are sure to turn heads. Remember, take your time and be patient with this process. With a little bit of practice, you’ll be a mascara pro in no time.
Wrapping It Up: My Final Thoughts
There you have it, folks – my tips and tricks for applying mascara to thin eyelashes! It’s not rocket science, but there are a few things you need to keep in mind to achieve the best results.
Remember to choose the right mascara formula and always prepare your lashes by curling them and using a primer. When you’re applying the mascara, take it slow and wiggle the wand as you move it up your lashes. If you run into any clumping issues, use a lash comb to separate your lashes.
Finally, don’t forget to use a spoolie brush to finish things off and give your lashes a more natural look. With these tips in mind, you’ll be able to rock some seriously voluminous lashes in no time!
Applying Mascara FAQs
How can I make my thin eyelashes look fuller?
Okay, so listen up! Mascara can be a real game-changer for ladies with thin eyelashes, and I’m here to help you out. First things first, curl your lashes! This will give your eyelashes an extra boost and make them look longer and more defined. Next, choose a mascara that’s designed for volumizing or lengthening. Look for a mascara brush that has lots of bristles or a fiber-based formula. Start at the base of your lashes and wiggle the brush back and forth while pulling it upwards. Be sure to coat every lash, including the tiny ones in the corners. To add even more drama, consider using an eyelash primer before adding mascara. This will create a base layer for your mascara to cling to, making your eyelashes look even fuller and thicker. Finally, don’t forget to apply mascara to your bottom lashes too. Use light, downward strokes to add just a touch of definition. With these tips, your eyelashes will be looking thick and luscious in no time!
How do you deal with thin eyelashes?
Well, let me tell you, as someone with super thin and sparse lashes, I have tried every trick in the book to get mascara to stick. First off, I always make sure to curl my lashes with an eyelash curler before applying anything. This just helps to give my lashes a bit of lift and makes them look a bit fuller. Then, I like to use a mascara that has a thinner wand, so that the product doesn’t clump together my sparse lashes. I gently wiggle the wand back and forth at the base of my lashes and then pull it through to the tips. I usually do this a couple of times, and I find that this helps to make my lashes look more voluminous. If I’m feeling extra fancy, I’ll use an eyelash primer before I apply mascara. This just helps to give my mascara something to adhere to, and it really seems to make a difference in how long my mascara lasts throughout the day. To apply, I just swipe a thin coat of the primer onto my lashes and let it dry for a few seconds before applying my mascara. Finally, I have found that using a waterproof mascara helps to keep my lashes curled and looking full all day long. It can be a bit more difficult to remove, but for me, it’s worth it to have my lashes looking their best. And there you have it – my top tips for applying mascara to thin lashes!
Which benefit mascara is best for thin lashes?
Okay, so I have thin eyelashes too, and for the longest time, I didn’t know how to apply mascara to them without making them look clumpy and fake. But after years of experimenting, I’ve found a few tricks that always work for me. First of all, I would recommend using a mascara that’s specifically designed for thin lashes. I’ve tried a few different ones, but my favorite is the Benefit Roller Lash mascara. It has a special curved brush that grabs onto each individual lash and coats it evenly without clumping. Plus, it also helps to lift and curl your lashes, which makes them appear fuller and more voluminous. When it comes to actually applying the mascara, I always make sure to wiggle the wand at the base of my lashes before pulling it up and out towards the tips. This helps to separate the lashes and distribute the mascara evenly. I also like to apply a second coat after letting the first one dry for a few seconds, but be careful not to overdo it or you’ll end up with clumpy lashes. Finally, if you’re really struggling to make your thin lashes look more voluminous, you can always try adding a set of false lashes or using a lash serum to promote growth and thickness over time. But with the right mascara and application technique, you might not even need to!